5 Gallon Bucket Hydroponic System: A Complete Guide

Welcome to the world of hydroponics, a gardening method that allows you to grow plants without soil, using a nutrient-rich water solution instead. Whether you’re a gardening novice or a seasoned green thumb, setting up a 5-gallon bucket hydroponic system is a great way to dip your toes into this innovative and rewarding growing technique. This guide will walk you through everything you need to know about creating and maintaining your own 5-gallon bucket hydroponic system, from gathering the right materials to troubleshooting common issues.
Hydroponics might seem complex at first, but the beauty of a 5-gallon bucket system lies in its simplicity and accessibility. With just a few basic supplies and some patience, you can start growing a variety of plants—right in your own home. I’ll also share some of my top tips and product recommendations to help you get the best results from your setup.
What is a 5 Gallon Bucket Hydroponic System?
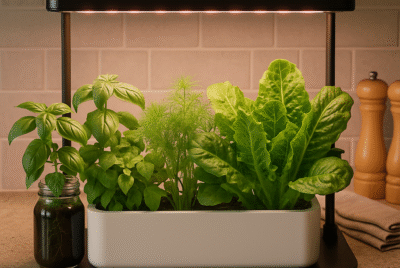
A 5-gallon bucket hydroponic system is one of the most straightforward forms of hydroponics. Essentially, it involves growing plants in a 5-gallon bucket filled with water, which is enriched with a nutrient solution. This method uses a soilless medium like clay pellets or rock wool to support the plants, while an air pump oxygenates the water, ensuring that the plant roots receive the oxygen they need to thrive.
Components of a 5-Gallon Bucket Hydroponic System
1. 5-Gallon Bucket:
This serves as the primary container for the nutrient solution.
Recommended Product: Hydrofarm 5-Gallon Bucket – Sturdy and reliable, perfect for long-term use.
2. Net Pot:
A mesh container that holds the plant and allows the roots to dangle into the nutrient solution.
– Recommended Product: iPower 6-Inch Net Pot – Durable and well-sized for various plants.
3. Growing Medium:
A soilless material like clay pellets that supports the plant roots.
– Recommended Product: Hydrofarm Grow!t Clay Pebbles – Provides excellent aeration and drainage.
4. Air Pump and Air Stone:
Essential for oxygenating the nutrient solution.
– Recommended Product: VIVOSUN Air Pump with Air Stone – Efficient and quiet, ideal for small systems.
5. Nutrient Solution:
A balanced mix of minerals and nutrients to feed the plants.
– Recommended Product: General Hydroponics Flora Series – A comprehensive nutrient system that promotes vigorous growth.
With these components, you can create a simple yet effective hydroponic system that is ideal for small spaces and beginner growers.
Advantages of Using a 5 Gallon Bucket Hydroponic System
If you’re considering hydroponics, you might wonder why a 5-gallon bucket system is the way to go. There are several compelling reasons, especially for those new to hydroponics or with limited space.
Space Efficiency
One of the biggest advantages of a 5-gallon bucket hydroponic system is its compact size. These systems can fit into tight spaces, making them perfect for apartments, balconies, or even indoors under a grow light.
Recommendations for Space Efficiency:
1. Stackable Buckets:
Consider buckets that can be stacked when not in use to save space.
Recommended Product: Dura-Gold Stackable Buckets – These buckets stack neatly, optimizing storage.
2. Wall-Mounted Air Pumps:
Save floor space by mounting your air pump on the wall.
Recommended Product: VIVOSUN Wall-Mounted Air Pump – Keeps your setup tidy and off the ground.
3. Compact Growing Medium Storage:
Use containers that can be easily stored away when not needed.
Recommended Product: VIVOSUN Grow Bag – Foldable and easy to store, yet durable enough for repeated use.
4. Flexible Grow Lights:
Choose grow lights that can be mounted or adjusted to save space.
Recommended Product: VIPARSPECTRA LED Grow Light – Adjustable and efficient for small spaces.
5. Foldable Workstation:
A collapsible table or shelf for working on your system without taking up permanent space.
Recommended Product: Lifetime Foldable Utility Table – Versatile and easy to store.
Cost-Effectiveness
A 5-gallon bucket hydroponic system is one of the most affordable ways to start hydroponic gardening. With a minimal initial investment, you can start growing your own food, which can lead to significant savings in the long run.
Recommendations for Cost-Effectiveness:
1. Budget-Friendly Buckets:
Opt for durable yet affordable buckets.
Recommended Product: Encore Plastics 5-Gallon Bucket – Economical and reliable.
2. DIY Air Pumps:
If you’re handy, you can build your own air pump setup using cheaper components.
Recommended Product: DIY Air Pump Kit – A cost-effective way to get your air pump system running.
3. Reusable Net Pots:
Invest in net pots that you can reuse across multiple growing seasons.
Recommended Product: Greenco Reusable Net Pots – Sturdy and built to last.
4. Economical Nutrient Solutions:
Look for nutrient solutions that offer a good balance between price and quality.
Recommended Product: FoxFarm Liquid Nutrient Trio – Affordable and effective for various plants.
5. DIY Grow Lights:
Build your own grow lights using LED strips.
Recommended Product: DIY LED Grow Light Kit – Cost-efficient and customizable for your space.
Easy to Manage for Beginners
The 5-gallon bucket system is a great entry point into hydroponics. It’s simple to set up and maintain, making it ideal for those just starting.
Recommendations for Easy Management:
1. User-Friendly Buckets:
Choose buckets with easy-to-read measurement markings.
Recommended Product: Gamma Seal 5-Gallon Bucket – Includes a twist-off lid for easy access.
2. Automated Air Pumps:
Consider an air pump with a built-in timer to automate oxygenation.
Recommended Product: Hygger Quiet Air Pump with Timer – Simplifies maintenance with automatic controls.
3. pH Testing Kits:
Simplify nutrient management with a reliable pH testing kit.
Recommended Product: Apera Instruments pH Tester – Accurate and easy to use.
4. Pre-Mixed Nutrient Solutions:
Use pre-mixed nutrients to eliminate the guesswork.
Recommended Product: Advanced Nutrients pH Perfect – Convenient and foolproof for beginners.
5. Beginner-Friendly Grow Mediums:
Choose easy-to-use growing mediums that require minimal preparation.
Recommended Product: Cz Garden Clay Pebbles – Ready-to-use out of the bag, ideal for beginners.
Versatility: 5 Gallon Bucket Hydroponic System: A Complete Guide
With a 5-gallon bucket hydroponic system, you can grow a wide variety of plants. From leafy greens to herbs and even some fruiting plants, this system can accommodate them all.
Recommendations for Versatility:
1. Universal Net Pots:
Use net pots that can fit various plants.
Recommended Product: Yoocaa Universal Net Pots – Compatible with different plants and growing mediums.
2. Adjustable Air Pumps:
Use an air pump with adjustable airflow to cater to different plant needs.
Recommended Product: Uniclife Adjustable Air Pump – Versatile enough for different setups.
3. Multi-Purpose Nutrient Solutions:
Choose nutrients that work well for a range of plants.
Recommended Product: Botanicare Pure Blend Pro – Suitable for various plant types.
4. Modular Growing Mediums:
Select growing mediums that can be adjusted for different plants.
Recommended Product: Mother Earth Hydroton Clay Pebbles – Versatile and easy to use for multiple plants.
5. Customizable Lighting:
Opt for grow lights that can be tailored to different plants’ light requirements.
Recommended Product: Roleadro LED Grow Light – Adjustable light spectrum for various growth stages.
Scalability
As you become more confident with your 5-gallon bucket hydroponic system, it’s easy to scale up. You can add more buckets or transition to a more complex system without much hassle.
Recommendations for Scalability:
1. Interlocking Buckets:
Invest in buckets that can easily be connected or expanded as you grow more plants.
Recommended Product: Buckets Garden Interlocking 5-Gallon Bucket – Designed for easy expansion and scalability.
2. Expandable Air Pumps:
Use an air pump with multiple outlets to support additional buckets.
Recommended Product: EcoPlus Commercial Air Pump – Powerful enough to handle multiple buckets.
3. Modular Nutrient Systems:
Choose nutrient systems that can be scaled up without needing completely new products.
Recommended Product: General Hydroponics MaxiGro & MaxiBloom – Designed for scalability, allowing you to grow with your system.
4. Stackable Grow Lights:
Opt for grow lights that can be linked together or expanded to cover more plants.
Recommended Product: Spider Farmer SF-2000 LED Grow Light – Easily expandable and ideal for larger setups.
5. Flexible Grow Mediums:
Use grow mediums that can be bought in bulk and stored for future use.
Recommended Product: Clay Pebbles by The Hydroponic City – Available in bulk sizes, perfect for scaling your system.
How to Set Up a 5 Gallon Bucket Hydroponic System
Now that you understand the benefits of a 5-gallon bucket hydroponic system, let’s dive into the setup process. This step-by-step guide will help you create a functioning hydroponic system that’s easy to maintain and produces great results.
Step 1: Gather Your Materials
Before you begin, you’ll need to gather all the necessary materials. Having everything on hand will make the setup process smoother and quicker.
Essential Materials:
1. 5-Gallon Bucket:
This will serve as the main container for your nutrient solution. Choose a bucket that is food-grade to ensure it’s safe for growing edibles.
Recommended Product: Hydrofarm 5-Gallon Food Grade Bucket – Durable and safe for growing food.
2. Net Pot:
A mesh pot that will hold your plants in place while allowing the roots to grow into the nutrient solution.
Recommended Product: iPower 6-Inch Net Pot – Sturdy and provides good support for plants.
3. Growing Medium:
A soilless material like clay pebbles or rock wool to support the roots.
– Recommended Product: Hydrofarm Grow!t Clay Pebbles – Provides excellent aeration and root support.
4. Air Pump and Air Stone:
An essential component to oxygenate the nutrient solution, ensuring healthy root growth.
– Recommended Product: VIVOSUN Air Pump with Air Stone – Reliable and quiet, perfect for home use.
5. Nutrient Solution:
A balanced mix of nutrients specifically designed for hydroponics.
– Recommended Product: General Hydroponics Flora Series – A comprehensive nutrient solution for healthy growth.
6. pH Testing Kit:
Ensuring the pH of your nutrient solution is in the right range is critical for plant health.
– Recommended Product: Apera Instruments pH Tester – Accurate and easy to use, perfect for beginners.
7. Hydroponic Nutrient Mix:
A pre-mixed nutrient solution can save you time and ensure your plants get the right balance of nutrients.
– Recommended Product: FoxFarm Liquid Nutrient Trio – An easy-to-use option that’s perfect for beginners.
8. Digital Timer:
Helps automate the air pump operation, ensuring consistent oxygenation.
– Recommended Product: BN-LINK 7 Day Heavy Duty Digital Programmable Timer – Easy to program and reliable.
9. Blackout Cover:
To prevent algae growth, use a blackout cover on the bucket.
– Recommended Product: Heavy Duty 5-Gallon Bucket Lid with Blackout Cover – Prevents light from entering the bucket.
10. Temperature Gauge:
Monitor the temperature of your nutrient solution to avoid overheating.
– Recommended Product: Inkbird ITC-308 Temperature Controller – Perfect for keeping your nutrient solution at the optimal temperature.
Step 2: Preparing the Bucket
Once you have all your materials, it’s time to prepare the bucket. Proper preparation is key to ensuring your system functions efficiently and your plants thrive.
Preparation Steps:
1. Drill Holes for Air Tubing:
Start by drilling a small hole near the top of the bucket for the air tubing. This will allow the tubing to enter the bucket without causing leaks.
– Recommended Product: DEWALT 20V Max Cordless Drill – Ideal for making precise holes in your bucket.
2. Install the Net Pot:
Cut a hole in the bucket lid that matches the size of your net pot. The net pot should fit snugly into the hole without falling through.
– Recommended Product: Bosch Hole Saw Kit – Perfect for cutting clean holes for your net pots.
3. Add the Air Stone:
Place the air stone at the bottom of the bucket, ensuring it’s positioned centrally for even oxygen distribution.
– Recommended Product: Pawfly Air Stone – Provides excellent bubble distribution, ensuring good oxygenation.
4. Set Up the Tubing:
Connect the air tubing to the air stone and feed it through the hole you drilled in the bucket.
– Recommended Product: VIVOSUN 16-Feet Air Tubing – Flexible and durable, ideal for hydroponic systems.
5. Test for Leaks:
Fill the bucket with water to test for leaks. Make sure the air stone is working properly and no water is leaking from the tubing hole.
– Recommended Product: Flex Tape Rubberized Waterproof Tape – Use this to seal any leaks that might occur.
Step 3: Setting Up the Water and Nutrient System
With your bucket and air system prepared, it’s time to add the water and nutrient solution that will feed your plants. This step is crucial for ensuring your plants get the right amount of nutrients.
1. Fill the Bucket with Water:
Start by filling the bucket with water. If possible, use distilled or filtered water to avoid contaminants that could affect plant growth.
– Recommended Product: ZeroWater 40-Cup Ready-Pour Dispenser – Ensures your water is free from impurities.
2. Add Nutrients to the Water:
Follow the instructions on your nutrient solution to mix the correct ratio of nutrients into the water. Be precise, as too much or too little can harm your plants.
– Recommended Product: General Hydroponics Flora Series – Offers clear mixing instructions and reliable results.
3. Check and Adjust pH Levels:
After adding the nutrients, use your pH testing kit to check the pH of the solution. Most plants thrive at a pH level of 5.5-6.5. Adjust as needed using pH up or down solutions.
– Recommended Product: General Hydroponics pH Control Kit – Easy to use and effective for pH adjustments.
4. Oxygenate the Nutrient Solution:
Turn on the air pump to start oxygenating the nutrient solution. This will help keep the roots healthy and prevent stagnation.
– Recommended Product: Hydrofarm Active Aqua Air Pump – Quiet and efficient, ensuring continuous oxygenation.
5. Monitor Nutrient Levels:
Regularly check the nutrient levels in your bucket, especially as your plants grow. Top up as needed to ensure your plants are always well-fed.
– Recommended Product: Bluelab Combo Meter – Monitors pH, conductivity, and temperature in one convenient device.
Step 4: Installing the Air Pump
The air pump is a critical component of your hydroponic system. It ensures that the nutrient solution is oxygen-rich, which is vital for healthy root development. Proper installation and maintenance of the air pump are essential for keeping your plants thriving.
1. Position the Air Pump:
Place the air pump above the water level to prevent back siphoning. This is important to avoid damage to the pump and ensure it functions correctly.
– Recommended Product: Tetra Whisper Air Pump – Compact and easy to place in various locations.
2. Secure the Air Tubing:
Ensure the air tubing is securely connected to both the air pump and the air stone. Check for any kinks or blockages that could restrict airflow.
– Recommended Product: VIVOSUN Airline Tubing – Flexible and easy to connect, ensuring smooth airflow.
3. Test the Air Flow:
Before adding your plants, test the airflow to ensure the air stone is producing a consistent stream of bubbles. Adjust the air pump settings if necessary.
– Recommended Product: Uniclife Adjustable Air Flow Valve – Allows you to control the airflow for optimal oxygenation.
4. Keep the Air Pump Clean:
Regularly check the air pump and tubing for dust and debris. Clean them as needed to ensure efficient operation.
– Recommended Product: Aquaneat Air Pump Accessories Kit – Includes everything you need for regular maintenance.
5. Use a Check Valve:
Install a check valve in the air tubing to prevent water from flowing back into the air pump, which can damage the equipment.
– Recommended Product: Pawfly Aquarium Check Valve – Prevents water from backflowing into the air pump, protecting your system.
Step 5: Adding Your Plants
Once your hydroponic system is fully set up and the nutrient solution is ready, it’s time to add your plants. This is the exciting part where you get to see your hard work come to life!
1. Choose the Right Plants:
Select plants that are well-suited for hydroponic growing. Leafy greens like lettuce, spinach, and herbs are great choices for beginners, but you can also experiment with tomatoes, cucumbers, or even strawberries.
Recommended Product: Burpee Lettuce Buttercrunch Seeds – A hardy, easy-to-grow leafy green perfect for hydroponic systems.
2. Prepare the Plants:
If you’re starting from seeds, consider germinating them in a seed starter tray until they develop a few leaves. If you’re transplanting seedlings, gently remove them from their original container, being careful not to damage the roots.
Recommended Product: Jiffy Seed Starter Tray – Ideal for germinating seeds before transplanting into your hydroponic system.
3. Place the Plants in the Net Pots:
Fill the net pots with your chosen growing medium, then gently place the plant into the pot. Ensure the roots have enough space to grow downward into the nutrient solution.
Recommended Product: GROWNEER 6-Inch Net Pots – Sturdy and provide ample space for root growth.
4. Lower the Net Pot into the Bucket:
Once your plant is secured in the net pot, place the pot into the hole on the bucket lid. The roots should just touch the nutrient solution, allowing them to absorb the nutrients and water.
Recommended Product: VIVOSUN Hydroponic Net Cups – Compatible with most 5-gallon bucket systems and ideal for various plants.
5. Monitor and Adjust:
After placing your plants in the system, keep a close eye on them over the next few days. Make sure they’re getting enough light, and that the roots are beginning to grow into the nutrient solution.
Recommended Product: Bluelab Combo Meter Plus – Continuously monitors pH, EC, and temperature, ensuring optimal conditions for plant growth.
Maintaining Your 5 Gallon Bucket Hydroponic System
Once your hydroponic system is up and running, ongoing maintenance is crucial to ensure healthy plant growth and a bountiful harvest. Proper maintenance involves monitoring water levels, nutrient concentration, and the overall health of your plants. Here’s a breakdown of the key tasks you need to perform regularly.
Monitoring Water Levels and Nutrients
Keeping a close eye on water and nutrient levels is essential for the success of your hydroponic system. Plants in a hydroponic system rely solely on the nutrient solution for all their needs, so any imbalance can quickly affect their health.
Steps for Monitoring:
1. Check Water Levels Daily:
Make it a habit to check the water level in your bucket daily. As your plants grow, they will consume more water, so it’s important to ensure the roots are always submerged.
– Recommended Product: Hydrofarm Active Aqua Water Level Indicator – Easily monitor water levels without opening the bucket.
2. Top Off the Water:
If the water level drops too low, top it off with fresh water. Remember to adjust the nutrient concentration after adding water to maintain the right balance.
– Recommended Product: General Hydroponics Flora Series – Easy to adjust nutrient levels when adding fresh water.
3. Monitor Nutrient Concentration:
Use a nutrient concentration meter (EC meter) to monitor the strength of your nutrient solution. If it’s too weak, your plants may not grow well; if it’s too strong, it could damage the roots.
– Recommended Product: Bluelab Conductivity Pen – A precise tool for monitoring nutrient concentration.
4. Adjust Nutrient Levels as Needed:
If the nutrient concentration is off, either add more nutrient solution or dilute it with fresh water. Always aim to keep the nutrient levels within the optimal range for your specific plants.
– Recommended Product: FoxFarm Liquid Nutrient Trio – Easily adjustable for various plants and growth stages.
5. Replace Nutrient Solution Weekly:
It’s a good practice to completely replace the nutrient solution in your system every week to prevent the buildup of salts and ensure a fresh supply of nutrients for your plants.
– Recommended Product: General Hydroponics FloraKleen – Helps flush out salts and residues from your hydroponic system.
Controlling Pests and Diseases
Even in a controlled environment like hydroponics, pests and diseases can occasionally become an issue. Keeping your system clean and monitoring your plants regularly can help prevent these problems from taking hold.
Steps for Pest and Disease Control:
1. Inspect Plants Regularly:
Check your plants daily for any signs of pests, such as small insects, holes in the leaves, or discoloration. Catching problems early can prevent them from spreading.
– Recommended Product: Magnifying Glass with Light by AIXPI – Helps in detailed inspection of plants for pests or diseases.
2. Maintain a Clean Environment:
Cleanliness is key in hydroponics. Regularly wipe down your equipment, including the air pump, tubing, and bucket, to prevent mold and bacteria buildup.
– Recommended Product: Concrobium Mold Control – Safe for use around plants and effective against mold.
3. Use Natural Pest Control:
If you spot pests, try using natural methods first, such as neem oil or insecticidal soap. These options are less harmful to your plants and won’t contaminate your nutrient solution.
– Recommended Product: Bonide Neem Oil – An effective, natural option for controlling pests in hydroponic systems.
4. Keep the Area Around Your System Clean:
Pests are often attracted to dirt and debris. Keeping the area around your hydroponic setup clean and free from plant debris can reduce the risk of infestations.
– Recommended Product: O-Cedar EasyWring Microfiber Spin Mop – Perfect for keeping your growing area clean.
5. Monitor Humidity Levels:
Some diseases, such as powdery mildew, thrive in high humidity. Use a humidity gauge to keep track of the humidity levels around your system and make adjustments if necessary.
– Recommended Product: ThermoPro TP50 Digital Hygrometer – Monitors temperature and humidity levels, helping to prevent disease.
Harvesting Your Plants
The ultimate reward of maintaining a hydroponic system is harvesting the fruits of your labor. Knowing when and how to harvest your plants is crucial for ensuring the best flavor and continued growth.
Steps for Harvesting:
1. Determine the Right Time to Harvest:
The timing of your harvest depends on the type of plant you’re growing. Leafy greens like lettuce can be harvested when they reach a desirable size, while fruiting plants should be picked when they are fully ripe.
– Recommended Product: Harvest Time Guide by True Leaf Market – A detailed guide on when to harvest different types of plants.
2. Use Clean, Sharp Tools:
Always use clean, sharp scissors or a knife to harvest your plants. This helps prevent damage to the plant and reduces the risk of spreading diseases.
– Recommended Product: Fiskars Gardening Shears – Sharp and easy to use, perfect for precise harvesting.
3. Harvest in the Morning:
If possible, harvest your plants in the morning when they’re most hydrated and full of nutrients. This is especially important for leafy greens.
– Recommended Product: Garden Tower 2 – Modular Composting System – Helps in managing morning harvests with ease.
4. Prune Regularly:
In some cases, you can harvest plants by pruning them regularly, which encourages continued growth. For example, herbs like basil benefit from regular pruning to promote bushier growth.
– Recommended Product: Truly Garden Pruning Shears – Ideal for regular pruning and maintenance of your plants.
5. Store Your Harvest Properly:
After harvesting, store your produce in the appropriate conditions to maintain freshness. Leafy greens, for example, should be stored in a cool, humid environment.
– Recommended Product: OXO Good Grips Greensaver – Keeps harvested produce fresh for longer.
Common Mistakes to Avoid
Even with a well-designed hydroponic system, mistakes can happen. Being aware of common pitfalls can help you avoid them and ensure your plants thrive.
Top Mistakes and How to Avoid Them:
1. Overfeeding or Underfeeding Plants:
One of the most common mistakes is getting the nutrient concentration wrong. Too much can burn your plants, while too little will starve them. Always follow the manufacturer’s instructions and use a reliable nutrient concentration meter.
– Recommended Product: Bluelab Combo Meter – Ensures accurate nutrient levels, preventing overfeeding or underfeeding.
2. Poor Water Quality:
Using tap water without testing it can lead to problems if it contains high levels of chlorine or other contaminants. Use filtered or distilled water to ensure the best results.
– Recommended Product: Brita UltraMax Water Dispenser – Filters out impurities, providing clean water for your plants.
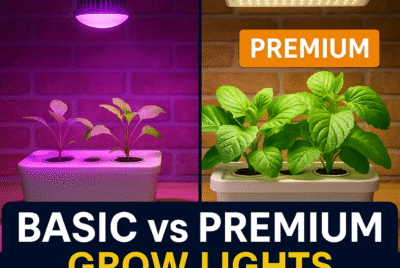
3. Inadequate Lighting:
Not providing enough light, or using the wrong type of light, can severely stunt plant growth
and lead to weak, leggy plants. Ensure your plants receive the appropriate amount of light for their growth stage and type.
Lighting Mistakes to Avoid:
1. Using Insufficient Light:
Hydroponic plants need a good amount of light to thrive, especially in the vegetative and flowering stages. If your lights aren’t powerful enough, your plants won’t grow properly.
– Recommended Product: Spider Farmer SF-2000 LED Grow Light – Provides full-spectrum lighting that’s ideal for hydroponic plants.
2. Incorrect Light Distance:
Placing lights too close or too far from your plants can cause issues. Too close, and you risk burning the leaves; too far, and the plants may stretch and weaken.
– Recommended Product: VIVOSUN Grow Tent Complete Kit – Includes an adjustable light system to maintain the proper distance from your plants.
3. Ignoring Light Timing:
Some plants require specific light schedules to trigger flowering. Using a programmable timer ensures they receive the right amount of light and darkness.
– Recommended Product: BN-LINK 7 Day Heavy Duty Digital Programmable Timer – Controls your light schedule for optimal plant growth.
4. Using the Wrong Light Spectrum:
Different stages of plant growth require different light spectrums. Ensure your grow lights provide both blue (for vegetative growth) and red (for flowering) spectrums.
– Recommended Product: Phlizon CREE COB Series LED Grow Light – Delivers a balanced spectrum for all growth stages.
5. Not Providing Light Coverage:
Ensure that all your plants receive equal light exposure by using reflective materials or additional lights to cover the entire growing area.
– Recommended Product: VIVOSUN Mylar Reflective Grow Tent – Maximizes light coverage and efficiency.
Troubleshooting Common Issues
Even the best hydroponic setups can encounter problems. Knowing how to identify and troubleshoot common issues can save your plants and keep your system running smoothly.
Common Issues and Solutions:
1. Nutrient Deficiencies:
Yellowing leaves, stunted growth, or poor fruit production often indicate a nutrient deficiency. Regularly check and adjust nutrient levels to prevent this.
– Recommended Product: General Hydroponics Flora Series – Balanced nutrients that help prevent deficiencies.
2. Root Rot:
Root rot is a common issue in hydroponic systems caused by poor oxygenation or contaminated water. To prevent this, ensure your air pump is working efficiently and that your water is clean.
– Recommended Product: Hydroguard Bacillus Root Inoculant – Helps protect against root rot by promoting healthy root development.
3. pH Imbalance:
An incorrect pH level can prevent plants from absorbing nutrients properly. Use a reliable pH meter and adjust the pH as needed to keep it within the optimal range.
– Recommended Product: Apera Instruments AI209 Value Series pH Tester – Ensures accurate pH readings, allowing for precise adjustments.
4. Algae Growth:
Algae can form in your nutrient solution if it’s exposed to light. Prevent this by using blackout covers on your buckets and keeping your growing area clean.
– Recommended Product: Hydrofarm 5-Gallon Bucket Lid with Blackout Cover – Prevents light from reaching the nutrient solution, reducing algae growth.
5. Pest Infestation:
Although less common in hydroponics, pests can still invade your system. Regularly inspect your plants and use natural pest control methods if necessary.
– Recommended Product: Captain Jack’s Deadbug Brew – Organic and effective against a wide range of pests.
Conclusion
A 5-gallon bucket hydroponic system is a fantastic way to delve into the world of hydroponics. Its simplicity, cost-effectiveness, and scalability make it an excellent choice for both beginners and experienced gardeners. With proper setup and maintenance, you can enjoy fresh, home-grown produce year-round, regardless of the weather outside.
Whether you’re growing leafy greens, herbs, or even fruiting plants, following the steps and recommendations outlined in this guide will help ensure your hydroponic system thrives. As you gain experience, you can experiment with different plants, nutrient solutions, and system configurations to optimize your yields and further your understanding of hydroponic gardening.
FAQs: 5 Gallon Bucket Hydroponic System: A Complete Guide
What types of plants grow best in a 5-gallon bucket hydroponic system?
Leafy greens like lettuce, spinach, and kale are ideal for beginners, but you can also grow herbs, strawberries, and small fruiting plants like cherry tomatoes.
How often should I change the nutrient solution in my hydroponic system?
It’s recommended to replace the nutrient solution every one to two weeks to prevent salt buildup and ensure your plants receive fresh nutrients.
What should the pH level of my nutrient solution be?
The optimal pH range for most hydroponic plants is between 5.5 and 6.5. Keeping your nutrient solution within this range ensures proper nutrient absorption.
How do I prevent algae from growing in my hydroponic system?
To prevent algae growth, keep your nutrient solution in a dark container, use blackout covers, and avoid exposing the solution to light.
Can I use tap water in my hydroponic system?
Tap water can be used, but it should be filtered to remove chlorine and other impurities. Alternatively, you can use distilled or reverse osmosis water for the best results.
*We may earn a commission from purchases made through our links, at no cost to you. This does not affect our product recommendations. Please see our disclosure to learn more.