Bottle Hydroponics Guide: Fresh Greens Anywhere
Introduction to Bottle Hydroponics
Have you ever wanted to grow your own vegetables and herbs but felt limited by space or budget? Let me introduce you to the world of bottle hydroponics. It’s an innovative, sustainable way to garden that can fit right into your kitchen or balcony.
What is Bottle Hydroponics?
Bottle hydroponics is a method of growing plants without soil, using water, nutrient solutions, and recycled bottles. It’s perfect for urban gardeners or anyone looking to save space and money.
Why Choose Bottle Hydroponics?
Bottle hydroponics offers a unique way to garden with minimal space and cost. Here are five reasons why you should consider it:
1. Efficient Use of Space: Whether you live in a small apartment or just want to utilize vertical space, bottle hydroponics allows you to grow plants in tight quarters.
2. Cost Savings: Using recycled bottles and homemade nutrient solutions can significantly cut down on gardening expenses.
3. Sustainability: This method reduces waste by repurposing plastic bottles and conserving water compared to traditional gardening.
4. Control Over Growing Conditions: You can easily monitor and adjust the nutrient levels and light exposure, leading to healthier plants and higher yields.
5. Year-Round Gardening: With bottle hydroponics, you can grow plants indoors all year long, regardless of the weather outside.
Benefits of Bottle Hydroponics
Space Efficiency
1. Vertical Gardening: Use a wall or shelving unit to stack bottles vertically, maximizing limited space.
2. Compact Designs: Create a mini garden on your windowsill or kitchen counter using small bottles.
3. Portability: Easily move your garden around to catch sunlight or free up space as needed.
4. Customizable Layouts: Tailor your bottle arrangement to fit any space, from tight corners to expansive walls.
5. Urban Living: Ideal for city dwellers who lack access to outdoor gardening areas.
Cost-Effectiveness
1. Recycled Materials: Repurpose plastic bottles and other household items to create your hydroponic system.
2. Homemade Nutrient Solutions: Save money by mixing your own nutrient solutions using affordable ingredients.
3. Minimal Equipment: Basic tools like scissors, a knife, and a measuring cup are all you need to get started.
4. Low Maintenance: Hydroponic systems require less maintenance and fewer resources than traditional soil gardening.
5. Energy Savings: With efficient LED grow lights, you can minimize electricity costs while providing optimal light for your plants.
Sustainability
1. Water Conservation: Hydroponics uses up to 90% less water than traditional soil gardening, making it an eco-friendly choice.
2. Waste Reduction: By using recycled bottles, you help reduce plastic waste.
3. Chemical-Free Gardening: Grow your plants without harmful pesticides and herbicides, promoting a healthier environment.
4. Energy Efficiency: Modern hydroponic systems are designed to be energy-efficient, reducing your carbon footprint.
5. Local Food Production: Grow your own food locally, reducing the need for transportation and its associated environmental impact.
Getting Started with Bottle Hydroponics
Ready to dive into bottle hydroponics? Here’s how to get started:
Choosing the Right Bottles
1. Size Matters: Select bottles based on the size of the plants you want to grow. Small herbs may do well in smaller bottles, while larger plants will need more space.
2. Material: Use sturdy plastic bottles that can withstand being cut and manipulated without breaking.
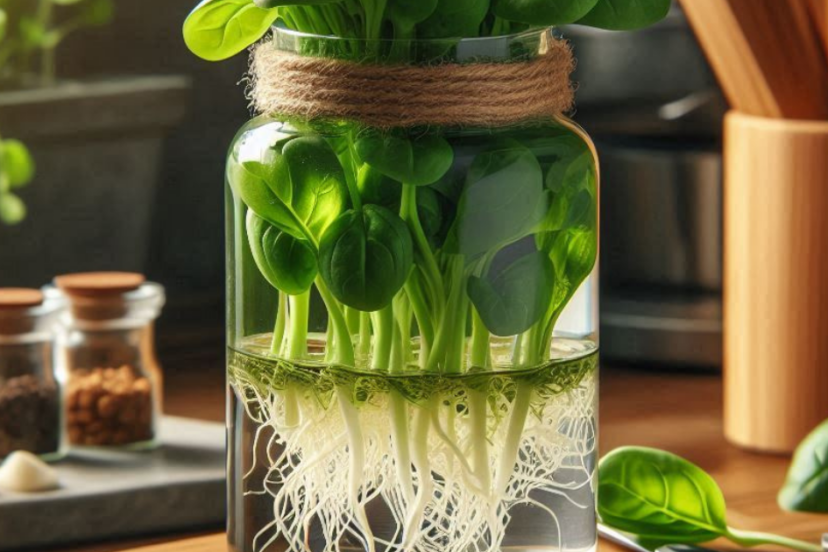
3. Transparency: Clear bottles allow you to monitor the root system and water levels easily.
4. Availability: Start with what you have at home. Reuse soda bottles, water bottles, or any plastic containers.
5. Safety: Ensure the bottles are free from harmful chemicals or residues that could affect plant growth.
Essential Tools and Materials
1. Cutting Tools: Sharp scissors or a craft knife for cutting the bottles.
2. Growing Medium: Rockwool, clay pebbles, or coconut coir to support plant roots.
3. Nutrient Solution: A balanced hydroponic nutrient mix tailored to the plants you’re growing.
4. Air Pumps: Optional, but beneficial for oxygenating the water and promoting healthy root development.
5. Grow Lights: Essential if you’re growing plants indoors without sufficient natural light.
Setting Up Your Bottle Hydroponics System
1. Cutting the Bottles: Cut the bottles in half or create openings for plants to grow through.
2. Assembling the System: Arrange the bottles in a vertical or horizontal setup depending on your space.
3. Filling with Growing Medium: Add your chosen growing medium to support the plants.
4. Adding Nutrient Solution: Fill the bottles with nutrient solution, ensuring the roots are adequately submerged.
5. Planting the Seeds: Place seeds or seedlings into the growing medium and monitor their growth.
Types of Plants Suitable for Bottle Hydroponics
While not every plant is ideal for bottle hydroponics, many thrive in this system. Here are five recommendations:
Herbs
1. Basil: Easy to grow and adds a fresh flavor to dishes.
2. Mint: Grows rapidly and can be used in drinks, desserts, and savory dishes.
3. Cilantro: Perfect for adding a zesty flavor to your meals.
4. Parsley: A versatile herb that’s great for garnishing and cooking.
5. Thyme: A hardy herb that thrives in hydroponic systems and adds depth to your cooking.
Leafy Greens
1. Lettuce: Grows quickly and provides fresh leaves for salads.
2. Spinach: Nutrient-dense and easy to grow in small spaces.
3. Kale: A superfood that’s robust and grows well in hydroponic systems.
4. Arugula: Adds a peppery taste to salads and sandwiches.
5. Swiss Chard: Vibrant and nutritious, it adds color and variety to your meals.
Small Fruit-Bearing Plants
1. Cherry Tomatoes: Compact and highly productive, perfect for bottle hydroponics.
2. Strawberries: Grow well in vertical setups and yield delicious fruits.
3. Peppers: Small varieties like bell or chili peppers can thrive in hydroponic bottles.
4. Cucumbers: Miniature cucumber varieties fit well in a bottle hydroponic setup.
5. Beans: Dwarf bean varieties can produce a good yield in a bottle hydroponic system.
Step-by-Step Guide to Setting Up Bottle Hydroponics
Ready to build your own bottle hydroponics system? Here’s a detailed guide:
Preparing the Bottles
1. Cleaning: Thoroughly clean and disinfect the bottles to remove any residues.
2. Cutting: Cut the top part of the bottle off. For some systems, you might cut the bottle in half and invert the top part into the bottom.
3. Draining Holes: If necessary, create small holes for drainage to prevent waterlogging.
4. Securing: Ensure the bottles are stable. Use wire or string to secure them if stacking vertically.
5. Labeling: Label the bottles if you’re growing different types of plants to keep track of their needs.
Creating the Nutrient Solution
1. Choosing Nutrients: Use a balanced hydroponic nutrient mix appropriate for your plant types.
2. Mixing: Follow the instructions on the nutrient package to mix with water.
3. pH Testing: Check the pH of the solution and adjust if necessary to ensure it’s in the optimal range (usually between 5.5 and 6.5).
4. Storage: Store the mixed solution in a cool, dark place to maintain its efficacy.
5. Replacing: Regularly replace the nutrient solution to avoid nutrient depletion.
Planting the Seeds
1. Pre-soaking Seeds: Soak seeds in water for a few hours to kickstart the germination process.
2. Planting Depth: Place the seeds at the correct depth in the growing medium, usually about twice the seed’s diameter.
3. Spacing: Ensure adequate spacing between seeds to allow for growth.
4. Covering: Lightly cover the seeds with the growing medium.
5. Watering: Moisten the growing medium to help seeds germinate.
Maintaining Your Bottle Hydroponics System
Keeping your hydroponic system running smoothly requires regular maintenance. Here are some key steps:
Monitoring Water Levels
1. Regular Checks: Check water levels daily to ensure roots are submerged but not waterlogged.
2. Top-ups: Add water as needed to maintain the correct level.
3. Evaporation: Be aware of evaporation rates, especially in warm climates.
4. Indicators: Use markers or indicators to help monitor water levels easily.
5. Automatic Systems: Consider an automatic watering system to maintain consistency.
Nutrient Management
1. Consistent Feeding: Stick to a regular feeding schedule based on your plant’s needs.
2. Concentration: Ensure the nutrient concentration is appropriate and adjust if plants show signs of nutrient stress.
3. Mix Fresh Solutions: Always use fresh nutrient solutions to avoid imbalances.
4. Flushing: Periodically flush the system with clean water to prevent nutrient buildup.
5. Monitoring Growth: Keep an eye on plant growth to determine if nutrient adjustments are needed.
Pest and Disease Control
1. Inspection: Regularly inspect plants for signs of pests or disease.
2. Hygiene: Maintain cleanliness in your hydroponic setup to prevent infestations.
3. Natural Remedies: Use natural pest control methods like neem oil or insecticidal soap.
4. Quarantine: Isolate affected plants to prevent the spread of disease.
5. Environmental Control: Ensure adequate airflow and light to deter pests and diseases.
Troubleshooting Common Issues
Even with the best care, problems can arise. Here’s how to address common issues:
Algae Growth
1. Light Exposure: Reduce light exposure to the nutrient solution by covering the bottles.
2. Cleaning: Regularly clean the system to remove algae.
3. Preventive Measures: Use opaque bottles or cover transparent ones with duct tape or paint.
4. Hydrogen Peroxide: Add small amounts of hydrogen peroxide to the water to control algae.
5. Beneficial Organisms: Introduce beneficial organisms that can outcompete algae.
Root Rot
1. Watering: Avoid overwatering and ensure proper drainage.
2. Oxygenation: Use air pumps to oxygenate the water and prevent root suffocation.
3. Cleanliness: Keep the system clean to prevent pathogen buildup.
4. Temperature Control: Maintain a cool temperature to inhibit fungal growth.
5. Preventive Products: Use root-boosting products that contain beneficial microbes.
Nutrient Deficiencies
1. Balanced Feeding: Ensure you’re providing a balanced nutrient mix suitable for your plants.
2. Observation: Learn to recognize signs of specific nutrient deficiencies (e.g., yellow leaves for nitrogen deficiency).
3. pH Balance: Regularly check and adjust the pH to ensure nutrient availability.
4. Supplementation: Use supplements if specific deficiencies are detected.
5. Regular Testing: Periodically test the nutrient solution to monitor nutrient levels.
Enhancing Your Bottle Hydroponics Setup
To get the most out of your bottle hydroponics system, consider these enhancements:
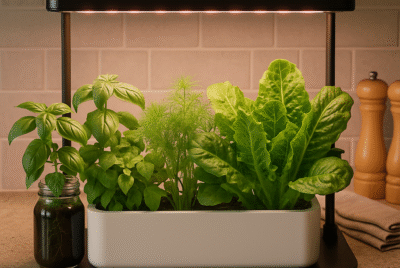
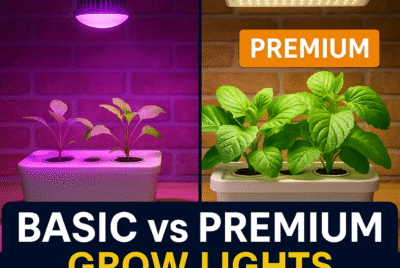
Adding a Grow Light
1. LED Lights: Use energy-efficient LED grow lights that provide the full spectrum of light needed for plant growth.
2. Positioning: Position lights close to plants but not so close that they cause heat stress.
3. Timers: Use timers to ensure plants get consistent light cycles, typically 16-18 hours of light per day.
4. Adjustable Fixtures: Opt for adjustable light fixtures to accommodate growing plants.
5. Reflective Surfaces: Use reflective materials around your setup to maximize light exposure.
Using Air Pumps
1. Oxygenation: Air pumps help oxygenate the nutrient solution, promoting healthy root development.
2. Bubble Stones: Use bubble stones to evenly distribute oxygen in the water.
3. Consistent Operation: Keep air pumps running consistently to maintain oxygen levels.
4. Noise Control: Choose quiet air pumps if noise is a concern.
5. Backup Power: Consider a backup power source for air pumps in case of power outages.
Incorporating a Timer
1. Automation: Use timers to automate lighting and watering schedules.
2. Consistency: Timers ensure plants receive consistent care, improving growth and yield.
3. Energy Savings: Optimize energy use by controlling when lights and pumps are active.
4. Customization: Program different schedules for different plants or growth stages.
5. Maintenance: Regularly check and adjust timer settings as needed.
Harvesting and Enjoying Your Produce
Reaping the rewards of your hard work is one of the most satisfying parts of hydroponics. Here’s how to do it right:
Signs Your Plants Are Ready
1. Size and Color: Harvest herbs when they are lush and vibrant in color.
2. Fruit Maturity: Pick fruits like tomatoes or peppers when they reach full color and size.
3. Leaf Quality: Harvest leafy greens when they are tender and before they start to yellow.
4. Smell: Some herbs give off a strong aroma when ready to harvest.
5. Growth Rate: Monitor the growth rate and harvest at the peak of growth.
Best Practices for Harvesting
1. Timing: Harvest in the morning when plants are most hydrated.
2. Tools: Use clean, sharp scissors or knives to avoid damaging the plants.
3. Selective Harvesting: Only take what you need, allowing the plant to continue growing.
4. Handling: Handle plants gently to avoid bruising or damaging them.
5. Storage: Store harvested produce in appropriate conditions to maintain freshness.
Tips for Using Your Fresh Produce
1. Immediate Use: Use fresh herbs and greens immediately for the best flavor and nutrition.
2. Preservation: Preserve surplus produce by drying, freezing, or making sauces and pestos.
3. Culinary Experimentation: Try new recipes to make the most of your fresh produce.
4. Gifting: Share your homegrown produce with friends and family.
5. Feedback: Experiment and adjust your growing techniques based on how the produce tastes and performs in recipes.
Reviews and Ratings of Bottle Hydroponics Systems
Choosing the right system can make all the difference. Here’s a look at some popular options:
Popular Bottle Hydroponics Kits
1. AeroGarden Sprout: A compact system perfect for beginners, offering easy setup and maintenance.
2. Hydroponic Bottle Garden by Urban Leaf: A DIY kit using recycled bottles, great for eco-conscious gardeners.
3. Click and Grow Smart Garden: An automated system that simplifies the growing process with pre-seeded pods.
4. Deep Water Culture (DWC) Kits: Offers a more
advanced setup for those looking to expand their hydroponics skills.
5. Homemade DIY Kits: Customizable and cost-effective, allowing you to tailor the setup to your needs.
User Experiences and Testimonials
1. Ease of Use: Many users highlight the simplicity and convenience of bottle hydroponics, particularly for urban environments.
2. Space Efficiency: Testimonials often praise the ability to grow a substantial amount of produce in limited space.
3. Cost Savings: Users appreciate the affordability of starting with recycled bottles and homemade nutrient solutions.
4. Plant Health: Positive reviews frequently mention the robust health and rapid growth of plants in hydroponic systems.
5. Educational Value: Many find bottle hydroponics a great learning tool for understanding plant biology and sustainable practices.
Expert Opinions
1. Sustainability Experts: Advocate for bottle hydroponics as an eco-friendly solution to urban gardening challenges.
2. Agricultural Scientists: Praise the efficiency and potential for high yields in controlled environments.
3. Nutritionists: Highlight the benefits of growing your own fresh, nutrient-rich produce.
4. Environmentalists: Support the reduction of plastic waste through repurposing bottles for gardening.
5. Hydroponic Professionals: Recommend bottle hydroponics as an accessible entry point for those new to hydroponic gardening.
My Personal Experience with Bottle Hydroponics
Getting into bottle hydroponics has been a transformative journey for me. Here’s a glimpse into my experience:
Getting Started
1. Initial Curiosity: My interest was piqued by the idea of growing food in a small apartment setting.
2. Research Phase: I spent weeks researching different hydroponic methods and decided to start with bottle hydroponics due to its simplicity and low cost.
3. Sourcing Materials: Gathering recycled bottles and basic tools from around my home made the initial setup virtually free.
4. First Setup: My first attempt involved growing basil and lettuce. The setup process was straightforward, following online guides.
5. Initial Success: Seeing the first sprouts emerge was incredibly rewarding and motivated me to expand my system.
Challenges and How I Overcame Them
1. Algae Growth: Initially, I struggled with algae. I overcame this by covering bottles to block light and adding a few drops of hydrogen peroxide to the water.
2. Nutrient Imbalance: My plants showed signs of nutrient deficiencies. Regular pH testing and adjusting the nutrient mix resolved this issue.
3. Space Constraints: Limited space was a challenge, but vertical gardening and creative bottle arrangements maximized my growing area.
4. Lighting Issues: Insufficient natural light led me to invest in LED grow lights, which significantly improved plant growth.
5. Root Rot: Overwatering caused root rot in a few plants. I learned to monitor water levels more carefully and ensure proper drainage.
Success Stories
1. Bountiful Harvest: My bottle hydroponics system has produced an abundance of fresh herbs and greens, reducing my grocery bill.
2. Health Benefits: Having a supply of homegrown, pesticide-free produce has improved my diet and overall health.
3. Community Sharing: I’ve shared my produce and knowledge with neighbors, fostering a sense of community.
4. Educational Growth: This experience has deepened my understanding of sustainable gardening practices and plant biology.
5. Personal Fulfillment: The process of nurturing plants and watching them grow has been incredibly fulfilling and stress-relieving.
Tips for Success in Bottle Hydroponics
To help you succeed in your bottle hydroponics journey, here are my top recommendations:
Regular Monitoring
1. Daily Checks: Inspect plants daily for signs of stress, pests, or disease.
2. Nutrient Levels: Regularly check and adjust the nutrient solution to ensure plants receive the necessary nutrients.
3. Water Levels: Maintain proper water levels to prevent root drying or waterlogging.
4. Growth Progress: Track the growth of your plants to identify any issues early.
5. pH Levels: Regularly test and adjust the pH of your nutrient solution to maintain optimal conditions.
Maintaining Cleanliness
1. Routine Cleaning: Regularly clean bottles and other system components to prevent algae and disease buildup.
2. Sterilization: Periodically sterilize tools and equipment to maintain a healthy growing environment.
3. Debris Removal: Remove dead leaves and debris promptly to prevent mold and pests.
4. System Flushing: Occasionally flush the entire system with clean water to remove nutrient buildup.
5. Workspace Hygiene: Keep your growing area tidy and free from potential contaminants.
Consistent Nutrient Supply
1. Scheduled Feeding: Establish a consistent feeding schedule based on the needs of your plants.
2. Balanced Nutrition: Use a well-balanced nutrient mix appropriate for the types of plants you are growing.
3. Supplementation: Add supplements if needed to address specific deficiencies.
4. Concentration Monitoring: Ensure the nutrient solution concentration is appropriate for plant growth stages.
5. Quality Products: Use high-quality nutrient products to ensure the best results.
Comparing Bottle Hydroponics with Traditional Gardening
Understanding the differences can help you appreciate the unique benefits of bottle hydroponics:
Growth Rate
1. Faster Growth: Plants in hydroponic systems often grow faster due to direct access to nutrients and water.
2. Controlled Environment: The ability to control light, temperature, and nutrients can accelerate plant growth.
3. Year-Round Growing: Unlike traditional gardening, hydroponics allows for year-round cultivation indoors.
4. Reduced Stress: Hydroponic plants experience less stress from weather and pests, promoting faster growth.
5. Optimized Conditions: Tailoring the growing conditions to each plant’s needs results in optimal growth rates.
Yield Quality
1. Consistent Quality: Hydroponically grown plants often exhibit more consistent quality and size compared to soil-grown counterparts.
2. Flavor: Many growers report enhanced flavor in hydroponically grown produce due to precise nutrient control.
3. Nutrient Density: The controlled environment can lead to higher nutrient density in the produce.
4. Appearance: Hydroponic produce tends to have a cleaner, more appealing appearance due to the absence of soil.
5. Pest-Free: Reduced pest exposure means less damage to the plants and better overall quality.
Maintenance Effort
1. Ease of Access: Bottle hydroponics systems are easier to access and maintain, especially in small spaces.
2. Less Weeding: No soil means no weeds, reducing the time and effort spent on garden maintenance.
3. Automation Potential: Many aspects of hydroponics can be automated, such as lighting and nutrient delivery.
4. Lower Water Usage: Hydroponics systems use significantly less water, reducing the need for frequent watering.
5. Compact Design: The compact design of bottle hydroponics systems makes them easy to manage and maintain.
The Future of Bottle Hydroponics
The future looks bright for bottle hydroponics. Here’s what to expect:
Technological Advancements
1. Smart Systems: Integration of smart technology to automate and optimize hydroponic systems.
2. Better Lighting: Advancements in LED technology to provide more efficient and tailored light spectra.
3. Nutrient Delivery: Improved methods for delivering nutrients more precisely to plants.
4. Monitoring Tools: Enhanced sensors and monitoring tools for real-time tracking of plant health and growth.
5. Sustainable Materials: Development of more sustainable and eco-friendly materials for hydroponic setups.
Growing Popularity
1. Urban Adoption: Increasing adoption in urban areas where space is limited.
2. Educational Programs: More schools and educational institutions incorporating hydroponics into their curricula.
3. Community Gardens: Expansion of community hydroponic gardens to promote local food production.
4. DIY Movement: Growing interest in DIY hydroponic projects among hobbyists and enthusiasts.
5. Health Trends: Rising demand for fresh, locally grown produce driven by health and wellness trends.
Environmental Impact
1. Reduced Waste: Continued emphasis on reducing plastic waste through innovative recycling and reuse initiatives.
2. Water Conservation: Hydroponics’ efficient water use becoming a critical factor in areas facing water scarcity.
3. Local Production: Increased local food production reducing the carbon footprint associated with transportation.
4. Sustainable Practices: Adoption of more sustainable practices in hydroponic farming to minimize environmental impact.
5. Climate Resilience: Hydroponic systems providing a resilient alternative to traditional agriculture in the face of climate change.
Conclusion
In conclusion, bottle hydroponics offers a practical, sustainable, and rewarding way to grow your own food, even in the smallest of spaces. From choosing the right bottles and setting up your system to maintaining and troubleshooting, this guide has provided you with all the information you need to get started. So why wait? Dive into the world of bottle hydroponics and enjoy the benefits of fresh, homegrown produce right at your fingertips.
FAQs
What is the best type of bottle to use?
The best type of bottle to use is a sturdy plastic bottle, such as a 2-liter soda bottle. It should be transparent for easy monitoring of root growth and water levels, and it should be free from harmful chemicals.
How often should I change the nutrient solution?
You should change the nutrient solution every 1-2 weeks to ensure that your plants receive a consistent supply of nutrients. Regularly check the pH and concentration of the solution to maintain optimal growing conditions for your plants.
Can I grow root vegetables in a bottle hydroponics system?
While it’s technically possible to grow small root vegetables like radishes in a bottle hydroponics system, it can be challenging due to space constraints. Larger root vegetables, such as carrots or potatoes, require more depth and volume than typical bottle setups provide.
Do I need special lights for indoor bottle hydroponics?
Yes, if you don’t have access to sufficient natural light, you will need grow lights to ensure your plants get enough light for photosynthesis. LED grow lights are a popular and energy-efficient option.
How do I prevent algae growth in my hydroponic bottles?
To prevent algae growth, cover your bottles to block light from reaching the nutrient solution. You can use opaque materials, paint, or duct tape. Additionally, keep the nutrient solution covered and regularly clean your system to reduce algae buildup.
Is bottle hydroponics suitable for beginners?
Absolutely! Bottle hydroponics is a great starting point for beginners. It’s cost-effective, easy to set up, and requires minimal space. Plus, it provides a hands-on learning experience about plant care and hydroponic principles.
*We may earn a commission from purchases made through our links, at no cost to you. This does not affect our product recommendations. Please see our disclosure to learn more.