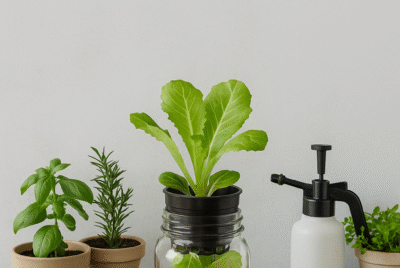
Kratky vs Wick: Best Beginner Hydroponic System Compared (2025)

Table of Contents
- Introduction
- Why Choosing the Right System Matters
- What Is the Kratky Method?
- What Is the Wick System?
- Side-by-Side Comparison
- Which Should You Choose as a Beginner?
- Recommended Starter Tools and Supplies
- Final Thoughts & Emotional Reflection
- Call to Action and Next Steps
Why Choosing the Right System Matters
When you first dip your toes into hydroponics, it’s easy to be swept away by the excitement—rows of leafy greens in jars, futuristic grow lights, and the promise of year-round harvests. But here’s something many beginners learn the hard way:
The system you choose can either make your first hydro experience joyful and empowering… or confusing, costly, and discouraging.
That might sound dramatic, but it’s true. Starting with the wrong hydroponic setup for your lifestyle, space, or attention span can lead to failure—not because hydroponics doesn’t work, but because the method didn’t work for you.
Think about it: would you hand a complex irrigation timer and nutrient pump system to someone who’s never grown a basil plant before? Probably not. And yet, this is what happens when new growers pick a flashy system over a functional one.
The Beginner’s Dilemma
Let’s imagine you’re just starting out. You’ve got a sunny windowsill or a spare shelf in your kitchen. You want to grow herbs or greens for your smoothies or salads. You don’t have a lot of tools, budget, or time—and you definitely don’t want wires, pumps, or mess.
So, you search “best hydroponic systems for beginners” and land on two popular names:
- The Kratky Method – A passive, zero-power setup involving a jar, water, and a nutrient solution.
- The Wick System – A slow, self-watering system using absorbent wicks to carry water to the plant’s roots.
Both seem simple. Both require little to no tech. And both promise healthy greens without soil.
But here’s the kicker: they function differently, thrive under different conditions, and each comes with its own quirks that may make or break your first attempt.
When the System Doesn’t Fit, Failure Feels Personal
One of the most heartbreaking things I’ve seen in the hydroponics community is a beginner who gives up after one attempt. The Kratky jar turned slimy. The wick dried out. The lettuce died. And suddenly the dream of growing food indoors feels out of reach.
But often, the issue wasn’t with the grower—it was with the fit between the grower and the system.
- If you’re someone who forgets to top off water levels, the Kratky method might punish you for it.
- If you choose the Wick system but place it in a cold, low-light area, it may never deliver enough water for your plants to thrive.
- If you’re growing large, thirsty plants like tomatoes, neither system may be ideal—and you’ll end up blaming yourself for what’s simply a mismatch in method.
That’s why this article exists: to help you choose the hydroponic system that matches not just your space—but your energy, habits, lifestyle, and goals.
The Power of Simplicity
Both the Kratky and Wick methods shine because of one thing: simplicity. They’re quiet. Affordable. And require no electricity. For people just testing the waters of hydroponics, they remove the biggest barrier: setup complexity.
You don’t need to understand water pumps, nutrient film flow, or aeroponics to use either. You just need to pick the one that aligns with how hands-on (or hands-off) you want to be.
| Decision Factor | Kratky Method | Wick System |
|---|---|---|
| Setup Difficulty | Extremely Easy | Easy |
| Maintenance | Low to Medium | Very Low |
| Best For | Leafy greens, herbs | Herbs, small indoor plants |
| Growth Speed | Fast | Moderate |
| Risk of Overwatering | Medium | Low |
| Power/Electricity Required | No | No |
| Water/Nutrient Refill Frequency | Every 1–2 weeks | Every 2–3 weeks (depending on wick strength) |
My Personal Experience
I started with the Kratky method using recycled mason jars and a handful of net cups. My basil shot up in 10 days. But I failed hard when I forgot to check water levels. One week later, the roots were dry, and the plant wilted.
So, I tried a wick system. I used a plastic bin, some felt strips, and a reservoir below. It was more forgiving. My thyme and mint grew slower, but they survived even when I forgot about them for a week.
Each system taught me something—about hydroponics, but also about my own gardening style. I learned that I do best with a system that’s forgiving when life gets busy, but responsive when I’m ready to tweak and tinker.
What This Means for You
Choosing between the Kratky and Wick method isn’t about which is “better”—it’s about which fits your rhythm.
- If you enjoy checking on your plants every few days and watching them grow quickly, Kratky might be for you.
- If you want something you can set and forget for a while (like a self-watering office garden), the Wick system might be a better match.
Reflection Prompt:
What do you want your hydroponic experience to feel like? Energizing and hands-on, or calm and low-maintenance?
Once you answer that, the rest of this article will guide you in choosing the system that suits your setup, your pace, and your personal version of green-thumb joy.
What Is the Kratky Method?
The Kratky method is often called the “set it and forget it” approach to hydroponics—and for good reason. It’s a simple, no-pump, no-electricity method where your plants grow in a nutrient solution that gradually recedes as they mature. This creates a natural air gap for the roots to breathe. No tech, no fuss—just smart science at work.
This passive hydroponic system was developed by Dr. Bernard Kratky and is perfect for new growers who want to try hydroponics without dealing with tubing, timers, or reservoirs.
How the Kratky System Works
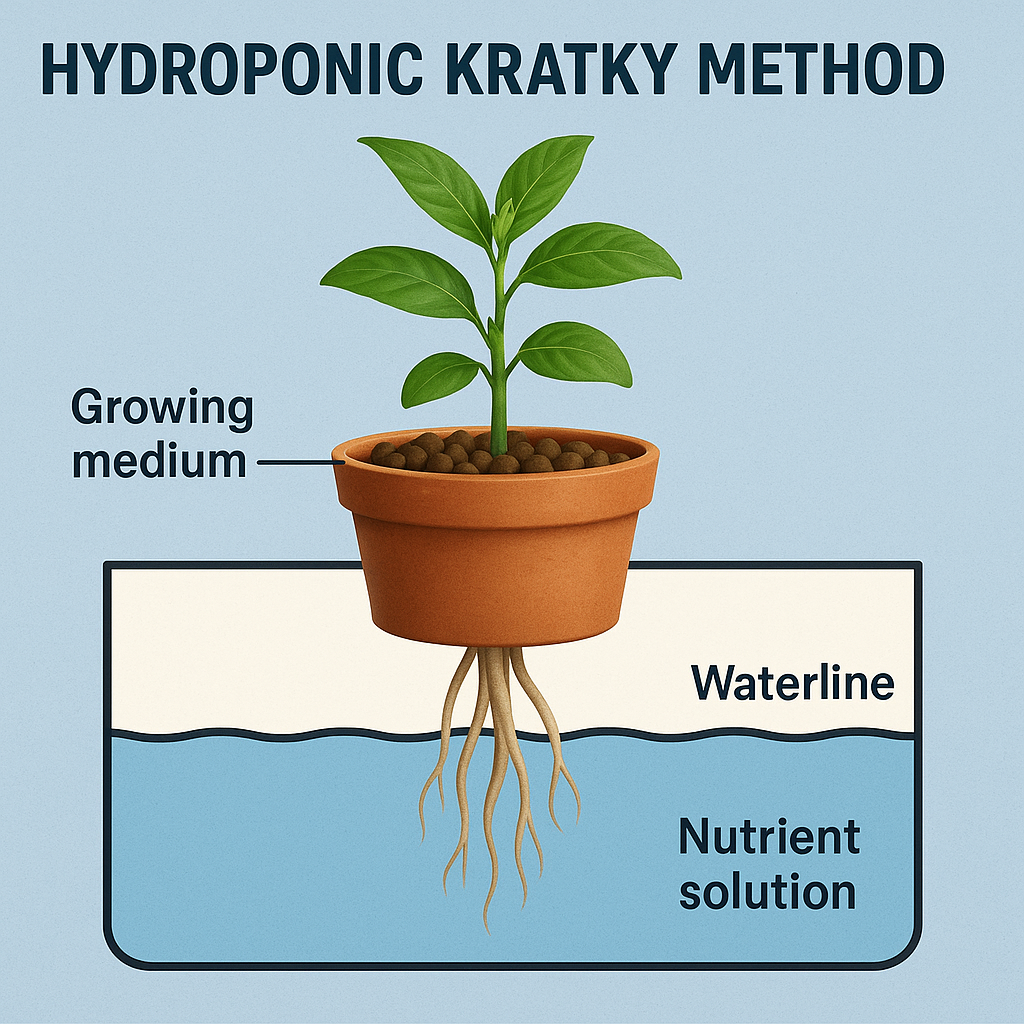
You suspend a plant in a net cup over a container of nutrient solution. As the plant absorbs the water, the level lowers—exposing more roots to oxygen while still giving them access to nutrients. It’s a natural ebb and flow that mimics what your plant needs without any intervention.
Why It’s Great for Beginners
The beauty of the Kratky method is in its simplicity:
- No electricity or moving parts—ideal for off-grid growing or low-tech environments.
- Affordable—uses jars, buckets, or plastic containers you already have at home.
- Beginner-friendly—set it up once, and let your plants grow on autopilot.
What Can You Grow with Kratky?
This method is best suited for fast-growing leafy greens and herbs:
- Lettuce
- Spinach
- Basil
- Kale
- Mint
These plants have short growth cycles and don’t require complex root structures or large amounts of nutrients—making them a perfect match.
What to Watch Out For
While it’s simple, Kratky isn’t completely hands-off forever. Keep an eye out for:
- Water depletion: If your plant uses up the water too fast, the roots may dry out. You’ll need to top up carefully without drowning the air gap.
- Algae growth: Light getting into the container can lead to algae buildup. Use opaque containers or cover the sides with foil or dark tape.
- Root rot: If the air gap isn’t large enough or humidity is too high, roots may rot.
Beginner Tips for Kratky Success
- Use wide-mouth mason jars for herbs on your windowsill.
- Mark the original water level on your container to track usage.
- Start with distilled or filtered water and use a mild nutrient mix for leafy greens.
- Check weekly, even if the system is mostly hands-off.
“My first Kratky setup was literally a coffee jar, a sponge, and a basil cutting. Two weeks later, I had fresh pesto—and I was hooked.”
The Kratky method proves that you don’t need to be a scientist or a gardener to grow your own food. It’s a gateway into the world of hydroponics that’s accessible, effective, and surprisingly rewarding. And once you get that first harvest, you’ll wonder why you didn’t start sooner.
Next up, let’s look at the Wick system—another beginner-friendly method that might be even more forgiving.
What Is the Wick System?
If the Kratky method is the “set it and forget it” style of hydroponics, the Wick system is the “slow and steady” approach. It’s passive like Kratky—meaning no electricity or moving parts—but works differently by using absorbent wicks to deliver water and nutrients to your plant’s roots from a reservoir below.
Think of it as a self-watering planter with a little hydroponic magic built in.
How the Wick System Works

The Wick system uses one or more “wicks” (usually made of cotton, felt, or nylon rope) to slowly pull nutrient solution from a bottom container up to the plant’s growing medium. The moisture moves via capillary action—no pumps, no timers, no fuss.
It’s often used with small containers, recycled materials, and very low-maintenance plants, making it ideal for complete beginners or those looking for an ultra-forgiving grow setup.
What Can You Grow with the Wick System?
Because the wick delivers a limited amount of moisture and nutrients, it’s best for small plants with modest demands:
- Herbs like mint, oregano, or thyme
- Small lettuce varieties
- Chives or green onions
- Indoor ornamentals or air-purifying plants (non-edible)
It’s not ideal for heavy-feeders like tomatoes, cucumbers, or peppers. These will outpace the wick’s supply and suffer in growth or yield.
Pros of the Wick System
- Very low maintenance: Great for people who travel or forget to water plants regularly.
- Safe for indoor use: No water splashing, no noisy air pumps, and minimal risk of spills.
- Recyclable setup: Old bottles, containers, and fabric strips make great materials.
- Consistent hydration: The wick ensures your plant never dries out entirely, making it ideal for sensitive seedlings.
Cons to Consider
- Slow growth: Wick-fed plants grow slower due to limited nutrient uptake.
- Not suitable for large or thirsty plants: The wick can’t deliver enough water fast enough.
- Risk of root rot: If the medium stays constantly wet without enough air, roots may rot or mould.
Common Wick System Materials
You can create a DIY Wick system with items you likely already have at home:
- Plastic bottle or container for the reservoir
- Cotton shoelace, mop strands, or nylon rope as the wick
- Small pot with a drainage hole for the plant
- Coco coir, perlite, or vermiculite as the growing medium
Beginner Tips for Success
- Use 2–3 wicks per plant to improve water delivery.
- Place the reservoir at least 2–3 inches below the plant pot to ensure slow upward flow.
- Test different wick materials—cotton absorbs well but can degrade; nylon lasts longer.
- Monitor your growing medium to ensure it’s damp, not soaked.
“I made my first Wick system out of a takeaway container and old t-shirt strips. My mint plant is still going strong, months later.”
If you’re looking for a truly hands-off, fail-proof way to keep small herbs or indoor plants alive and thriving, the Wick system is incredibly rewarding. It may not grow jungle-sized basil, but it will teach you the fundamentals of water, root care, and nutrient balance—all without overwhelming you.
Now that you’ve seen both systems in action, it’s time to line them up side by side and find out which one wins for beginners.
Kratky vs Wick – Side-by-Side Comparison
Now that you’ve got a feel for how both systems work, let’s break it down even further. The Kratky and Wick methods are often lumped together as “beginner hydroponic systems,” but they serve very different personalities and plant needs.
This section puts them head-to-head, so you can confidently pick the system that’s best for your space, schedule, and skill level.
Quick Overview
- The Kratky Method – Best for hands-on beginners who want fast results and don’t mind checking water levels weekly.
- The Wick System – Best for hands-off growers or busy plant parents who want a low-maintenance option for herbs and ornamentals.
1. Setup Difficulty
Kratky: Very easy to set up. Just need a container, net cup, and nutrients.
Wick: Also beginner-friendly, but requires a bit more DIY assembly (cutting wicks, placing reservoirs, prepping medium).
2. Maintenance Requirements
Kratky: Needs occasional refills and monitoring of water levels as plants grow.
Wick: Nearly maintenance-free once set up, as the wick self-regulates water delivery.
3. Plant Compatibility
Kratky: Ideal for fast-growing, leafy greens like lettuce, spinach, and basil.
Wick: Better for low-demand herbs like mint, oregano, and indoor houseplants.
4. Growth Speed
Kratky: Faster growth due to direct access to nutrients and oxygen as water recedes.
Wick: Slower growth due to limited and slower nutrient uptake through the wick.
5. Cost and Materials
Kratky: Very affordable—recycled jars, lids, and net pots are enough to get started.
Wick: Also cheap, especially if repurposing old containers and fabric, but may require more components initially.
6. Space and Portability
Kratky: Great for countertops, windowsills, and shelf gardens.
Wick: Compact and modular—can be hidden or built into decorative pots for subtle setups.
7. Risks and Limitations
Kratky: Risk of root rot or dry-out if not monitored. Single-use containers may need resetting after harvest.
Wick: Risk of waterlogging or under-delivery in certain wick types. Not ideal for large or fruiting crops.
My Verdict
If you’re excited about watching your plants grow fast, don’t mind checking in every few days, and want something a little more “active,” go Kratky.
If you prefer a system you can forget about (without killing your plants), and want the ultimate in simplicity and patience, the Wick system is your hydro hero.
“When I’m busy with work, I lean on my Wick setup to keep the herbs alive. But when I want that dopamine hit of fast growth? Kratky all the way.”
Reflection Prompt:
Do you want fast results and higher yields—or long-term ease with minimal effort? Which system fits your current lifestyle better?
Next up, we’ll share some real-world grower stories and community insights to help you connect the dots from setup to harvest.
Which Should You Choose as a Beginner?
You’ve got the facts. You’ve seen the breakdown. Now comes the big question: Which system is actually right for you? While both Kratky and Wick systems are beginner-friendly, your choice depends on how you want to start your hydroponic journey—and what kind of grower you are at heart.
Ask Yourself These Questions:
- Do you want faster results? Kratky gives you quicker growth for leafy greens—perfect for impatient beginners.
- Do you want a system that runs itself? Wick systems are slower but demand almost no upkeep once set up.
- Are you growing herbs or salad greens? Kratky excels at greens like lettuce and kale; the Wick system is great for mint and thyme.
- Do you have limited space? Both systems are compact—but Kratky jars look gorgeous on sunny windowsills.
- Are you interested in scaling later? Kratky can be scaled up more easily into larger non-circulating systems for multiple plants.
Beginner Profiles – Who Should Pick What?
You’ll love the Kratky method if:
- You’re hands-on and like checking in on your plants
- You want fast-growing greens and satisfying harvests
- You have a sunny windowsill and some spare mason jars
You’ll thrive with the Wick system if:
- You want a “set it and forget it” experience
- You travel often or forget to water your plants
- You’re experimenting with herbs and houseplants
“I started with Wick systems for the ease—but eventually moved into Kratky because I loved the feeling of seeing progress every day.”
Still Not Sure?
Here’s the great news—you don’t have to pick just one. Many beginner growers experiment with both. Try growing lettuce with Kratky and mint with a Wick setup. It’s fun, educational, and gives you a direct comparison as you learn what works best for your home and habits.
Inspiration from Our Community
💬 “I set up my Kratky system with a peanut butter jar, and my daughter loved watching her basil grow day by day. It got us both into gardening!”
💬 “As a total beginner, I started with the Wick method using old containers and shoelaces. Low effort, no stress.”
💬 “Kratky gave me the confidence to try more. I now have a shelf of leafy greens—indoors!”
Your Action Step Today:
Pick one plant you want to grow—basil, lettuce, mint, or spinach. Then decide: fast growth with Kratky, or easy maintenance with Wick?
Then grab a container, some water, and a seed. The best way to choose? Start growing.
In the next section, we’ll cover the essential tools and supplies for both systems—so you can set up your very first hydroponic grow today, no matter which method you pick.
Recommended Starter Tools and Supplies
Now that you’ve chosen your system—whether it’s Kratky, Wick, or both—it’s time to get your hands dirty (well, not really… this is hydroponics!). This section will walk you through the easiest, most affordable tools to kick off your grow setup without breaking the bank or your brain.
And the best part? Most of these items are either in your home already or can be picked up online with just a few clicks.
Starter Tools for the Kratky Method
The Kratky setup is famously simple. Here’s all you need to get started:
- Container: Mason jar, plastic tub, or any food-safe, opaque container (1–3L size is perfect)
- Net pot: A small mesh cup that fits over the container lid to hold your plant
- Grow medium: Clay pebbles, rockwool, or sponge to support the seedling
- Hydroponic nutrients: Look for a 2-part nutrient mix formulated for leafy greens
- Seeds: Lettuce, spinach, kale, basil, or arugula are excellent first crops
Optional but helpful: Blackout covers or aluminum foil to prevent light from entering the reservoir (reduces algae).
Starter Tools for the Wick System
Setting up a Wick system is just as easy, but the components differ slightly:
- Reservoir container: Any water-tight container or bottle placed beneath your grow container
- Wick material: Cotton rope, shoelaces, strips of old t-shirts, or mop cords
- Grow container: A small pot or cup with a hole at the bottom (for the wick to pass through)
- Growing medium: Coco coir, vermiculite, or a perlite mixture to retain moisture
- Seeds: Best choices include mint, oregano, chives, or smaller greens
- Hydroponic nutrients: A basic nutrient solution suitable for herbs
Picks for Fast Setup
If you’re ready to go from idea to action in minutes, here are some highly rated beginner kits and products you can order today:
- Kratky Hydroponic Jar Kit (8-pack) – Comes with net cups, nutrient solution, and easy instructions.
- General Hydroponics Flora Series Nutrients – Trusted 3-part nutrient system for leafy crops and herbs.
- LetPot Net Pots Seed Pots – Durable mesh pots that fit most jars and buckets.
- DIY Wick System Starter Kit – Pre-cut wicks and grow cups for fast indoor setups.
Note: Some of the above links may be affiliate links. If you make a purchase, we may earn a small commission—at no extra cost to you. It helps support more beginner-friendly content like this!
Where to Shop Locally
If you’re not into online shopping, check your local garden centre or hardware store. Look for:
- Seedling trays
- Food-safe containers
- Wicking cords (ask in the cleaning or rope sections!)
- Basic nutrients or compost teas
What NOT to Buy
To avoid wasted money, skip these for now:
- Expensive lighting systems (unless you’re in a very dark space)
- Timers, pumps, or digital meters (not needed for passive systems)
- Advanced nutrient boosters or pH kits—you can always level up later
Final Setup Tips
- Sanitise all containers and tools before use
- Label your jars or pots—especially if starting multiple plants
- Track growth progress weekly with notes or photos
- Don’t overthink it—your first system doesn’t need to be perfect
“I built my first Kratky system with a jam jar and a paper towel wick. It wasn’t pretty, but the lettuce didn’t mind!”
Next, we’ll wrap it all up with a summary of key takeaways, insights from the journey, and next steps to keep growing. Let’s bring it home.
Final Thoughts
Starting your hydroponic journey isn’t just about growing plants—it’s about growing confidence, consistency, and connection. Choosing between Kratky and the Wick system might seem like a small step, but for many beginners, it’s the gateway to something much bigger.
You’re not just planting seeds in water—you’re planting habits, routines, and a new perspective on food, sustainability, and personal growth.
“I used to think gardening required a backyard and hours of spare time. Now, a tiny Kratky jar on my windowsill reminds me every day that growth is possible anywhere.”
What Hydroponics Has Taught Me
When I first started, I was intimidated. I thought hydroponics meant expensive tech, lab coats, and LED panels. But what I found instead was simplicity. I found joy in watching a basil seed crack open, roots dance in the water, and leaves reach for the sun—all without a single drop of soil.
I’ve killed a few plants. I’ve made nutrient mistakes. I’ve let water levels drop too low. But I’ve also harvested salad bowls from jars and grown herbs that lifted my kitchen and my spirits. This journey isn’t about perfection—it’s about participation.
Your Journey, Your System
Whether you’ve already built your Wick setup or are gathering jars for Kratky, remember this: hydroponics meets you where you are.
- Pressed for time? Wick it.
- Craving speed and satisfaction? Kratky it.
- Not sure? Try both and learn as you grow.
You don’t have to become a hydroponic expert overnight. You just have to begin. Each new leaf is a little win. Each root is proof that change is happening—even if you don’t always see it.
Let’s Reflect Together
What system speaks to you right now? What’s one small habit you can build around your new plant setup?
Write it down. Take a photo. Share it with someone. Celebrate it. Because these small wins matter.
Hydroponics Isn’t Just About Plants
It’s about designing a space in your life that reminds you to slow down, care, and nurture. Whether it’s on a kitchen shelf, a classroom counter, or a bedroom window, hydroponic systems invite you to pay attention—to water levels, light, growth, and ultimately, yourself.
And trust me, once you feel the magic of watching something thrive from a jar or a rope wick, you’ll never look at gardening—or personal progress—the same way again.
Let’s keep growing—together.
Next Steps
Now that you’ve explored both the Kratky and Wick systems inside and out, it’s time to make your move. Don’t just bookmark this article and walk away—take one small step that moves you closer to growing something green, fresh, and rewarding.
1. Choose Your System
Still on the fence? Flip a coin. Seriously. The key is to start.
- Go Kratky if you want faster growth, more yield, and don’t mind checking in weekly.
- Try the Wick System if you prefer low effort, low risk, and steady herb growth with minimal input.
2. Download the Starter Guide
If you haven’t already, grab our 👉 free Hydroponics Starter Kit Handbook. It includes simple DIY setup instructions, plant pairing tips, and troubleshooting advice to avoid beginner mistakes.
3. Get the Tools You Need
We’ve compiled our favourite beginner-friendly products below. These are budget-conscious, high-rated, and perfect for your first grow:
- Kratky Hydroponic Jar Kit (8-pack) – Comes with net cups, nutrient solution, and easy instructions.
- General Hydroponics Flora Series Nutrients – Trusted 3-part nutrient system for leafy crops and herbs.
- LetPot Net Pots Seed Pots – Durable mesh pots that fit most jars and buckets.
- DIY Wick System Starter Kit – Pre-cut wicks and grow cups for fast indoor setups.
Disclaimer: Some links may be affiliate links. We earn a small commission at no cost to you—thank you for supporting our mission to make hydroponics accessible for all.
4. Share Your Progress
We’d love to see what you’re growing! Share your setup on social and tag us @UrbanHouseAndGarden. Join the conversation and get tips from fellow indoor gardeners.
5. Keep Learning
Stick with us. Each week, we’ll release a new article, video, or downloadable to help you level up your hydroponics skills—from seed to salad bowl.
Final Word: Hydroponics doesn’t need to be complicated or expensive. With just a jar, some water, and a little curiosity, you’re well on your way to growing a greener, smarter garden—right from your home.
🌱 Your hydro journey begins now.
*We may earn a commission from purchases made through our links, at no cost to you. This does not affect our product recommendations. Please see our disclosure to learn more.